Clik here to view.
 There's a good chance you've seen hairstylist Riawna Capri's work on Instagram, Pinterest, or the red carpet. It's even possible that you "recognize her face from somewhere." She's one of the most well-known hairstylists working today — and for good reason.
As you'd assume, her client list is impressive — Julianne Hough, Demi Lovato, Jennifer Lawrence, Emma Roberts, Nina Dobrev, Vanessa Hudgens — but she's also the co-owner of one of L.A.'s coolest salons, Nine Zero One. Which is exactly where we just spent an entire day learning a few looks that we just can't keep to ourselves.
Of course, there was no way we could spend a day at Nine Zero One without learning the secrets behind its signature "901 Wave." While you may have seen beach-hair tutorials before, this one involves some unique tricks that Capri and her team have finessed over the years. The result? A tried-and-true technique that delivers perfectly undone waves every single time. (They don't call it a signature for nothin'.)
One of the best parts of this look is that it works with any hair texture. Plus, it can be a wavy base for a variety of the styles Capri does on her clients. Playing on one of the biggest L.A. trends — the humble knot — Capri created a half-up knot, a tied topknot, and a woven updo (or, as Capri calls it, a "knot-hawk").
Ahead, Capri breaks down everything you need to know to score these four perfectly undone styles.
Image may be NSFW.
Clik here to view.

Look 1: The Signature 901 Wave
The beauty of this style is that it can be done on any hair texture under the sun — but it does require some length. Any haircut that's chin-length or longer will work, and you'll get a more undone result if you have a few layers. Start with dry, straight-to-slightly wavy tresses.
To begin, prep your 'do with whatever product gives you the most pliable hold once dry (we like mousse for fine to medium hair and styling cream for medium to textured hair). Those with fine to medium hair should rough-dry their locks (flip wet hair over and blast with a dryer sans brush) for volume; those with medium to thick and textured locks should start with a fresh or day-two blowout. Have curly hair? Don't stress about getting it super-straight — focus on loosening your curls until they become wavy — the iron will do the rest.
Clik here to view.

Begin by dividing your hair into three horizontal sections: the bottom, middle, and crown. Those with very thick hair can opt for an additional section if needed. You'll be working on them one by one in the above order, which will allow you to get a less uniform, and therefore more beachy, feeling, Capri says. (You'll understand why shortly.)
Give the entire section a light mist of hairspray, and heat a 1.25-inch iron. Capri uses T3's Twirl Convertible 1.25" Curling Iron, but the Hot Tools version will work, too. Going in alternating directions, clamp the iron on a 1 to 1.5-inch section and slowly move it down the length of the hair while you twist. Keep the iron vertical. Pause slightly at the middle (as seen here) to make sure the wave is concentrated in the mid-section. Then, keep collecting more length by twisting, but stop when you have one or two inches left. Do not curl your ends.
Clik here to view.

Release the section, and while it's still hot, gently pull on the ends. "Hair is like wax; you heat it up and you can mold it into whatever shape you want," Capri explains. "How it cools is how it will stay." Pulling the curl at this moment will turn it into a wave.
Image may be NSFW.Clik here to view.

Once the bottom section is done, layer in a texturizing spray and keep your hands off while the hair cools and the product sets. Oribe's Dry Texturizing Spray (seen here) is great for fine- to medium-weight locks, while the brand's Après Beach is better for dry, thick, curly, or textured hair because the formula comes with a hit of oil.
Image may be NSFW.Clik here to view.

There's a trick to the next section, and while it may seem a bit, er, precise, hear us out. To get the varied texture you see here, simply swap in a slightly smaller iron for the middle section or sections (if you have thicker hair). Capri is using the 1-inch attachment to the same iron she used on the bottom section.
While not ideal for traveling or when you have limited outlets or time, this small trick does make a big difference — plus, you probably already have a few irons lying around.
One more trick: Leaving the front portions for last, create your 1- to 1.5-inch sections directly above a curl you created in the lower section, and curl in the opposite direction as the section right below it. Think of your head as a checkerboard: Each curl you wrapped right should be surrounded by curls you wrapped left. It doesn't need to be perfect, obviously, but this will help the curls to fall in a unique way.
Now get started, but don't forget to mist your 'do with hairspray first.
Clik here to view.

Throw out all the rules when you get to the face. "Everything from your ears forward should be directed back, away from the face," Capri says. Once the front and back are done, layer in more texture spray...
Image may be NSFW.Clik here to view.

...and don't forget to pull on each section as you go.
Image may be NSFW.Clik here to view.

Switch back to your bigger iron and repeat the entire process on the crown — mist with hairspray, alternate directions, and pull to cool. Again, notice how the ends are left out. Layer in your texture spray now, avoiding the front sections, which are better left with minimal product for a softer result.
Image may be NSFW.Clik here to view.

There's a trick to the front that will make or break the entire look: Carefully smooth the iron down the front section, going away from the face, and pause for the curl parallel with the top of your cheekbone. This creates a bend that sits lower, so it not only ensures the style looks effortless, but is universally flattering. Cheekbones pop, it frames the eyes — you get it.
Image may be NSFW.Clik here to view.

Once all the curls are totally cooled, use one hand to lift the front section and the other to squeeze a few puffs of teasing powder into the roots. They're all basically the same, but Capri favors Unite's Expanda Dust because you can squeeze the soft bottle to get a cloud of product, as opposed to shaking it onto the roots, which can be a big ol' mess. This provides both volume and texture.
[Ed. note: You can use dry shampoo or your favorite texturizing product for this, but a teasing dust delivers the longest lasting result.]
Clik here to view.

Massage the roots with your fingers until all the product is absorbed. This also creates lift and a mussed-up look.
Image may be NSFW.Clik here to view.

And you're done! Do a few hair flips, and meet us on the next slide for a half-up knot.
On Sasha: Topshop sweater.
Clik here to view.

Look 2: The Half-Up Knot
Half-up hair can be tricky: Do too little and it looks boring, do too much and it looks dated. The simple knot Capri taught us here is the perfect way to add interest to the pared-down style, and it's a great way to wear the waves you just learned how to do on day two.
Hold on to your hats waves, because this one is surprisingly easy...
Clik here to view.

Spray hair with texture spray for grit, then loosely pull it back (do not pull tight). Create two sections that make up the top left and the top right halves of the head.
Image may be NSFW.Clik here to view.

Here's where you want to pretend you're tying your shoes and make a knot with the two sections. "It's really that simple," Capri says.
Image may be NSFW.Clik here to view.

Now pull the sections tight. Capri notes that the drier your hair is, the better it will hold, so those with very smooth hair should add some teasing dust for extra hold.
Image may be NSFW.Clik here to view.

Repeat to create a double knot.
Image may be NSFW.Clik here to view.

Keep one hand on the knot to prevent it from unraveling, and drive a few bobby pins into the style from various angles. Capri likes to zigzag the pins a bit when she's inserting them for extra hold. If you don't feel like your locks are going to stay (thick hair and very smooth hair can be tricky), spray your pins with hairspray and add a few puffs of teasing dust to the double knot.
Image may be NSFW.Clik here to view.

There you have it! Here's the view from the back...
Image may be NSFW.Clik here to view.

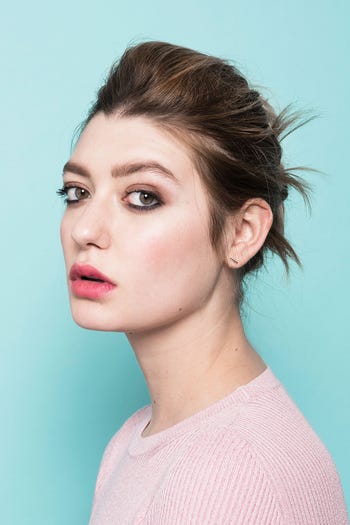
...and the front. Next up: a rad knotted updo.
On Sasha: Topshop dress.
Clik here to view.

Look 3: The Knot-Hawk
This woven take on a mohawk is easy to accomplish (really!) and can work during just about any occasion for which you'd want to wear your hair up. Sure, it looks demure from the front, but the back isn't so prim...
Clik here to view.

Similar to look two, this style benefits from a wavy base, so prep hair with the 901 Wave and let's jump in!
Disclaimer: You will need hair that's at least lob-length for these last two looks.
Clik here to view.

Begin to divide your hair into three sections — just like you did in look one — starting with the bottom. Tightly secure with a clear elastic (like this).
Tip: An imperfect part will be easier to hide later, so don't be precise.
Clik here to view.

Now create a middle pony the same way. If your hair is very thick, this can be split into two or even three (for very thick hair) sections instead of one. Keep the ponytails about two inches apart and comfortably secure.
Image may be NSFW.Clik here to view.
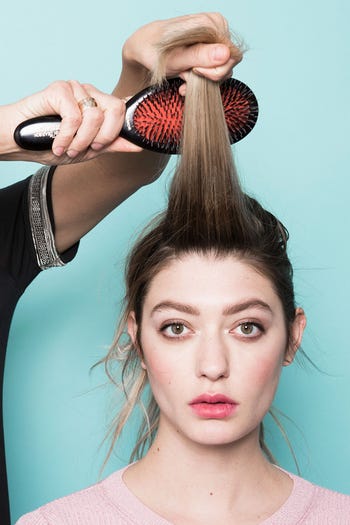
Before you create your final ponytail, give the hair on your crown a little body by backcombing. Capri used her Mason Pearson Boar Bristle & Nylon brush, but you'll get a similar result for less with Sonia Kashuk's Hair Brush.
Image may be NSFW.Clik here to view.

Have your desired amount of volume? Smooth back the hair and make your pony, but keep this one loose for a soft look.
Image may be NSFW.Clik here to view.

Now comes the fun part. Knot the length of each pony until you reach the end of that section...
Tip: If your hair is very long, secure after every few knots.
Clik here to view.

Secure the ends with another elastic. Before moving on, sprinkle or puff some volume powder onto the mid-lengths of each section and gently pull them apart. This will provide grit, hold, and volume. Translation: Don't skip this step.
Image may be NSFW.Clik here to view.

Focusing on the top pony first, wrap the hair around the base of the elastic to create a mini bun and pin in place. Allow the ends to stick out for added dimension.
Repeat on the second pony, but make sure that you don't leave any space between the top bun you just created and the middle one. Drive the pins into the new bun to secure it, and add more teasing dust if you need additional hold.
Clik here to view.

Repeat on the bottom pony, paying special attention to the spacing; the buns should be pressed right up against each other. Don't forget to leave the ends loose.
Image may be NSFW.Clik here to view.

Now it's time to marry the buns. Why is this important? Even if you left little to no space between them, they could begin to drift apart throughout the day or night.
Spray a bobby pin with hairspray and use a zigzag motion to connect the buns. You can do this in whatever way appears to be most effective for how your buns turn out. However, it often works to drive the pin through one and into the other, or insert at the border by using a zigzag motion to grab an equal part of each side as you drive in the pin.
Clik here to view.

Gently smooth out the sides if needed.
Image may be NSFW.Clik here to view.

There you have it: an updo that you can actually do yourself and that looks better when it's imperfect. You can tuck in the ends, or leave them out, which Capri prefers.
Image may be NSFW.Clik here to view.
We're not quite done — keep clicking for our final look.
On Sasha: Topshop sweater.
Clik here to view.

Look 4: The Tied Topknot
There's a reason the topknot is a hair staple for many: It's easy and you can do it on even the dirtiest of hair. Which, if you've been trying a few of these styles this week, is exactly what you need. Luckily, the more product your hair has taken the better this style will hold, so skip a shampoo and use your 901 Waves to create this instead.
Clik here to view.

Flip your head over and brush through your locks from root to tip, then smooth all your hair into a high pony and secure with an elastic.
Image may be NSFW.Clik here to view.

Remember the knotted ponytails you created in the last look? You're doing it on a larger scale, so divide the hair into two sections of equal size...
Image may be NSFW.Clik here to view.

...and, you guessed it — start knotting!
Image may be NSFW.Clik here to view.

Once you reach the end of the pony, secure with a clear elastic. If your hair is very long, you can secure every few knots for added hold.
Image may be NSFW.Clik here to view.
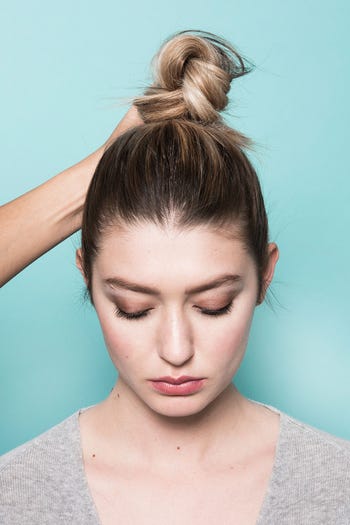
Now simply wrap the pony around the base, securing with pins along the way. Because you've knotted the length, you'll get this woven effect with little to no additional effort, although you can mold the bun into place before pinning if you prefer.
Image may be NSFW.Clik here to view.

And you're done!
On Sasha: A.L.C. sweater.
Clik here to view.

Like this post? There's more. Get tons of beauty tips, tutorials, and news on the Refinery29 Beauty Facebook page. Like us on Facebook — we'll see you there!
Like what you see? How about some more R29 goodness, right here?
Should You Be Taking Tips From This Viral Hair-Cutting Video?
The Best Photos Of Bold, Beautiful Short-Hair Inspiration
7 Products That Can Extend Your Hair's Longevity